FOR ASSISTANCE SUBMIT A REQUEST VIA OUR SERVICE CATALOG
Learner Guide
The following videos are provided by UC Systemwide Talent Management and Staff Development and are general to the UC system. Your experience may differ slightly based on local customization of certain features. If you are looking for information to help with an online course, be sure to read our list of Tips for eCourse Completion.
- Navigation Features
-
Timeline
Quickly view current, upcoming, incomplete assigned activities, launch a current eCourse, or cancel registration. Completed activities will drop off the timeline.
Timeline Segments View Description Total Displays all training information. This view can also list critical training activities or activities with an expiration date if configured by the administrator. Assigned Displays a list of assigned training activities including Required and Recommended activities. Critical Displays a list of all the critical training that a learner needs to take, such as:
- The learner's registered training
- The learner's assigned training
- A certification with an expiration date
- A non-certification with an expiration date
The system organizes these items in a sorted list using the "need by" date. The Due Date column lists the need by date on which the learner needs to have completed the critical training.
If the Due Date is in red, bold font, it indicates that a learner has not completed the learning activity by the date in the Due Date column, a certification has expired, or a non-certification with an expiration date has expired.
Current Displays a list of current training activities in Registered and In Progress status. Required Certifications Displays the certification information including Required and In progress certifications. Upcoming Displays a list of upcoming training activities, either Registered or Assigned. Past Due Displays overdue training activities. Tip: Still seeing tasks you just completed on the Timeline? Click Refresh at the top of the tab to update the list.
-
Browse the Library for Activities
Browse learning activities by category and topic.
-
Search for Activities
Use advanced filters in the search tool to refine your search.
-
Required Training or Training Analysis
Review the status of assigned or required learning activities as well as your certification history. See activity due date, last completed date, and expiration dates. You may start or register for assigned activities from this page as well.
If a required activity needs to be retaken on a regular basis, you will see a date in the Expiration Date column. The activity should be retaken by that expiration date to maintain certification in that activity. You will notice that the due date will also update to match this expiration date each time you complete the activity.
TIP: When retaking a previously completed eCourse be sure to choose "Retake" if prompted to record a new completion. If you choose review the system will not record the course launch.
-
Registration & Fees
Whether you have searched for a specific learning activity or browsed the library, once you have decided on the activity you wish to enroll in these are the steps you can take to register.
- Locate the activity you wish to register in by using the Library or Searching for the course using the title or a keyword.
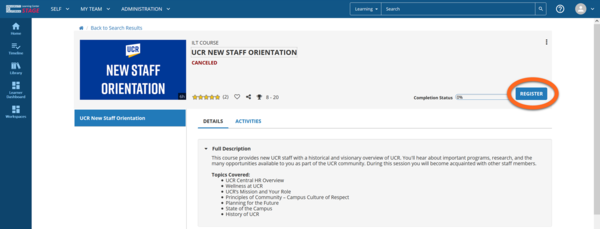
- Select the More Actions kebab icon and select Register
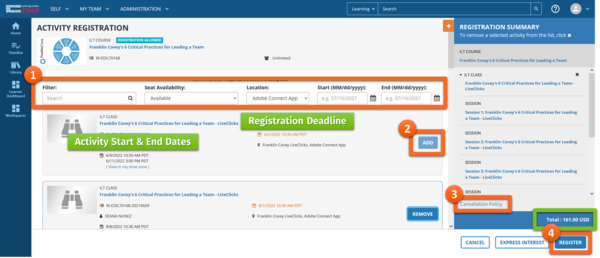
- Review the dates and time the course is offered. Note the filter options at the top of the list. Registration Deadlines will be highlighted in orange.
- Select Add to indicate the offering or class you wish to attend.
- If available, select Cancellation Policy in the lower left of the slide out menu to review the cancellation deadline and any associated fees.
- Scroll to the bottom right then select Register to finalize your registration. If there is a fee see below.
ONLINE ACTIVITIES: For web-based training, such as eCourses, you may or may not need to register first. For online activities that require registration:
- Review the registration activities: Required activities will be pre-selected, others you may need to select Add to choose it (e.g., choosing between the English and Spanish version of an online course)
- Select Register in the lower right of the screen.
If there is a fee
After selecting Register, you will be prompted to enter your payment information. Make sure you have a valid Chart of Accounts string (COA) before proceeding.
- Select COA from the Pay By drop-down menu
- Select Pay Now
- Enter your COA and select Submit.
- For alphabetic characters use CAPITAL LETTERS
- Leave no blank or empty fields. For any unused fields, enter the appropriate number of zeroes for that field. For example, the Program field would require three zeroes: 000.
- See the Oracle COA Golden Tree Viewer Overview for detailed information on COAs.
- Your registration will then be confirmed
STEP 2
Option A - From search results
Option B - From Activity Summary
STEPS 3-6
Registration Blocked message
If there are no current offerings of a classroom-based activity in the system, you will see an error message saying that registration is blocked. Hover your mouse over (or click on) the error messages and warnings to see a drop-down explaining that message.
Or, if a prerequisite activity is required then registration will be blocked until the prerequisites have been completed.
Express Interest
If there is a classroom-based activity that you are interested in attending, but there are no current offerings you are able to attend, you can express your interest and be notified when new offerings are added to the system. To express interest:
- Navigate to the course and select Register
- Select Express Interest in the lower right
- Leave a brief comment
- Select Ok
To find out when you indicated an interest in any activity, visit the Training Schedule page and select the Expressed Interest tab along the top. You may cancel your expression of interest from this page by selecting the checkbox to the left of the activity name then selecting Cancel Interest at the top of the list.
-
Attending Virtual Activities via Zoom, MS Teams, or Similar
You will register for the webinar in the UC Learning Center (UCLC) as you do for in-person classes. However, you will ultimately attend via the webinar/meeting application or web browser instance outside of the UCLC.
To attend a virtual activity offered through the UC Learning Center, take the following steps:
- Log into ucrlearning.ucr.edu and register as you would any in-person course offering.
- You will receive a registration confirmation email with instructions on how to join the webinar or meeting.
- If the email address listed for you in the UCLC is inaccurate, you may also access the email in the UCLC by going to Self > Learning > Messages. You may print messages as needed. It can take upwards of 15 minutes for confirmation notices to trigger after completing registration.
- If the event is an MS Teams a webinar, organizers may require you to register via MS Teams as well for attendance tracking purposes.
- Recommended: Set a calendar appointment for yourself and copy the webinar instructions into your appointment.
- On the Activity Start Date, follow the instructions in the registration confirmation email to join the event.
Zoom Resources for Attendees
We recommend downloading and installing the Zoom app; however, it is not required. For application installation and login instructions, visit the ServiceLink Knowledge Base article on Using Zoom for Video Conferencing.
UCR’s Zoom Service Page has helpful resources, including links to customer support and video tutorials. The Zoom Help Center also provides online support on a wide variety of topics.
Popular Zoom Video Tutorials:
- Getting Stared with Zoom Meetings (Select "Watch Live Recording")
- One Minute Video on How to Join a Zoom Meeting
If you experience any issues with the login process or have any questions about Zoom, please contact UCR BearHelp at BearHelp@ucr.edu or call 951-827-4848 (IT4U).
MS Teams Resources for Attendees
- See the ServiceLink Knowledge Base article Office 365 – Download/Install Office or Access Online for details on accessing MS Teams. While the desktop app is available it is not required and events may be accessed via a browser.
- Microsoft’s Support website offers detailed documentation and training for Teams, including a section specific to Meetings.
- ITS offers an introductory UCR Microsoft Teams Guide through the UC Learning Center
- LinkedIn Learning offers several courses
-
Manage Registrations or Training Schedule
Review current, ongoing, upcoming, waiting list, and express interest registrations as well as completed and canceled activities from your training schedule.
-
Cancel Registration
There are multiple paths to canceling a registration. Find the one that works best for you.
-
Launching & Relaunching an eCourse
Return to an eCourse you stepped away from before completing it.
-
Transcript & Certificates
Download your entire transcript or just the for the last year. Access certificates of completion for individual activities.
-
View Your Messages
You may view email notices sent to you by the system by going to the Self > Learning > Messages menu. We recommend regularly checking your messages in this way if you are not receiving emails from the UC Learning Center in your email account.
NOTE: Employee and Contingent Worker email addresses are pushed in from UCPath and are expected to be in the format of UCRNetID@ucr.edu. If the address listed in the system is missing or inaccurate, please contact your unit's shared services center for assistance updating the Business Email address filed in UCPath.
-
Mobile App
The SumTotal mobile app has limited functionality. We recommend accessing the site via a browser when possible.
The site URL is https://uc.sumtotal.host
QR Codes for Attendance
Attending an in-person or virtual instructor-led event? Be prepared with the SumTotal Mobile App to mark your attendance electronically. Some instructors or facilitators may have you sign a roster or sign-in sheet and some may have you scan a QR Code to confirm your attendance.
To mark your attendance with the app:
- Open and log into the SumTotal Mobile app (the site URL is https://uc.sumtotal.host)
- Under My Courses select the activity (if you are attending an ILT Class with multiple sessions, you will need to select the ILT Class and then the session(s), that is select the activity multiple times)
- Select the Mark Attendance button
- Scan the code
- Select Yes to confirm your attendance
NOTE: If you were not pre-registered you should start by scanning the code to register first and then follow the same steps above. If you were not pre-registered to an activity with a registration deadline or a cost you will NOT be able to use the app to mark attendance.
Download the guide!
Confirming Attendance via QR Codes & the SumTotal Mobile App
-
Self-Reported Training
You may record learning activities completed outside the UC Learning Center by using the Self-Reported Training tool. To access this tool go to: Self > Learning > Self-Reported Training. Self-Reported Training activities will appear on a separate section of the transcript.
To add a new activity:
- Click New at the top of the list
- Enter an Activity Name
- Select an Activity Type
- Choose a Start Date and an End Date
- Enter a duration and credit hours (if applicable)
- Fill in any remaining properties as needed
- Click OK
To edit an activity:
- Click the pencil icon to the left of the activity name
- Change properties as needed
- Click OK
To delete an activity:
- Check the box to the left of the activity name
- Click Delete at the top of the list
Learners
Problems completing an online activity? Before submitting a ticket, please see: I am not able to complete an eCourse, what can I do.


